A split second of distraction is all it takes, and the sauce is welded in black to the bottom of the pan.
Plenty of people reach for the bin bag in frustration - completely unnecessary.
Burnt rims, stubborn crusts and that sharp, acrid smell: scorched pans are irritating and they steal your time. Rather than resorting to harsh chemical cleaners or scrubbing for hours, there’s a surprisingly straightforward way to lift the damage using ingredients most kitchens already have.
Why pans burn so quickly - and when they can still be saved
Cooking on the hob is a balancing act: too little heat and nothing browns properly; too much and dinner catches. These foods are especially likely to burn:
- Milk-based dishes such as custard-style puddings or semolina porridge
- Tomato sauces and stews with lots of starch
- Rice, lentils and other pulses
- Sugary sauces and caramel
The key point is this: if the base is only very dark or covered with a hard layer, the pan can almost always be rescued. It becomes genuinely problematic only when the metal has slightly warped - in other words, the base looks visibly “domed”. From then on, heat can spread unevenly and scorching becomes more likely.
In most homes, pans are thrown away far too early - even though a simple household trick reliably loosens burnt-on layers.
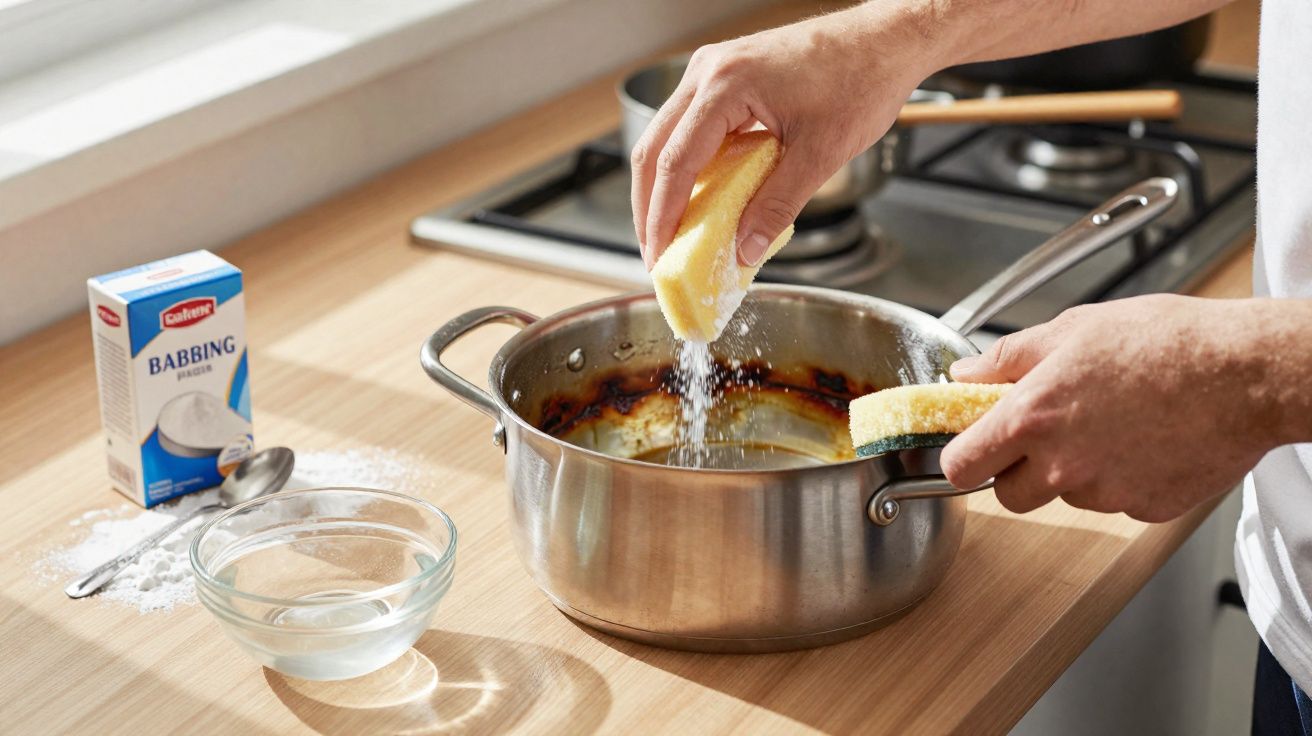
The simple trick: loosen the crust with household ingredients (baking soda)
The principle sounds modest, but it’s remarkably effective in practice: heat, water and a gentle, mildly alkaline agent work together to break the bond between the burnt food and the metal.
Step-by-step method for burnt pans
For the common scenario - burnt-on residue on the bottom - a combination of water and a cupboard staple is usually enough:
- Let the pan cool, then remove any loose bits roughly.
- Cover the base with water to a depth of about 1–2 cm.
- Sprinkle in 1–2 tablespoons of baking soda (or baking powder).
- Stir briefly so the powder disperses.
- Put the pan on the hob and heat until just below boiling.
- Turn the heat down and let it simmer gently for 10–15 minutes.
- Switch off the hob and allow the solution to cool in the pan.
- Pour away the liquid, then rub off the softened layer with a soft brush or sponge.
What you’ll notice: the grip between the residue and the metal weakens. The layer loses its hardness, sometimes flaking off in sheets, or it can be pushed away with minimal effort.
Letting a pan simmer briefly with a baking soda solution often saves you half an hour of heavy scrubbing.
What’s happening here: everyday chemistry
Sodium bicarbonate - commonly sold as baking soda - is a mild alkaline powder. It reacts with acids and alters the structure of burnt organic residues. That helps hard, charred layers crack and open up, allowing water to penetrate so the metal releases the crust more easily.
Baking powder also contains baking soda, along with an acidifying agent and starch. It’s a decent substitute if you don’t have pure baking soda to hand. The effect is a little weaker, but it usually works well for light to moderate build-up.
| Agent | Effect | Best for |
|---|---|---|
| Baking soda | Strong degreasing action; lifts burnt-on layers | Heavy crusts, dark discolouration |
| Baking powder | Similar to baking soda but slightly milder | Lighter burning |
| Vinegar | Dissolves limescale and light residues | Limescale rings; tea and coffee stains |
| Washing-up liquid | Emulsifies fats; gentle cleaning | Greasy residue that isn’t charred |
Alternative approaches for specific situations
Salt method for stainless steel and light scorch marks
If you’re only dealing with a thin brown film, many experienced cooks reach for another kitchen staple: coarse salt.
- Lightly dampen the base of the pan.
- Scatter a thin layer of coarse salt over it.
- Leave it for a few minutes.
- Rub in circles with a damp sponge.
Salt acts as a gentle abrasive: it removes discolouration without overly attacking stainless steel. However, this method is not suitable for non-stick pans.
Brown residue in a non-stick pan
Non-stick coatings do not tolerate scratching well. Steel wool and abrasive pads are off-limits. Here, a slower approach with washing-up liquid, water and time tends to work best:
- Fill the pan with warm water and add a squirt of washing-up liquid.
- Leave it to soak for several hours or overnight.
- Loosen the residue with a soft sponge; repeat if necessary.
If you go in aggressively, the coating can crack or lift. Once that happens, the pan loses its non-stick performance - and everything will catch more quickly in future.
What to avoid - common mistakes when “saving” a pan
When you’re staring at a blackened crust, drastic measures can feel tempting. Some of them do more harm to cookware than good.
- Metal scourers and knives: they cut into the crust and into the metal.
- Strong oven cleaners: can attack coatings and leave residues behind.
- Sudden temperature changes: pouring ice-cold water into a hot pan can warp the base.
Gentle chemistry beats brutal force in the long run - it saves more pans and spares your nerves.
Preventing burnt marks day to day
If you want your pans to last, build a few small habits into your cooking routine. Most burning problems come from rushing and using the wrong hob settings.
Heat, stirring, liquid - the three controls that prevent burnt pans (baking soda not required)
Three factors largely decide whether the base stays clean:
- Heat: use a medium setting rather than full power, especially for starchy foods.
- Stirring: regular stirring stops food bonding to the bottom.
- Liquid: add enough water or stock, and top up in time.
Cookware choice matters too. Thin, budget pans can develop hot spots. Better-quality bases with a layered (“sandwich”) construction spread heat more evenly and are more forgiving of small mistakes.
When it’s no longer worth rescuing
As tough as stainless steel and cast iron seem, they still have a finite lifespan. Regularly cooking on a very high flame or heating an empty pan pushes materials to their limits.
Warning signs include:
- a badly warped base that already wobbles on the hob
- flaking coatings on the inside
- deep grooves and scratches where food keeps lodging
In these cases, even the best trick only helps to a limited extent. It’s worth weighing up whether replacing the pan is better value over time - including the impact on energy use and cooking comfort.
A note on terminology: “burnt on” doesn’t always mean fully charred
In everyday conversation, people often say something is “burnt on” as soon as it sticks. Chemically speaking, there are stages: food first browns, then it becomes sticky and glued on, and finally it carbonises into something properly black and hard.
Each stage responds to a different approach. Light browning often shifts with hot water and washing-up liquid. Firmly stuck layers usually need the alkaline support of baking soda. For deep-black, brittle crusts, you may need several rounds - or you may decide to accept the last faint shadows as a bit of “patina”.
Kitchen example: burnt rice pudding
Rice pudding is a classic pan-ruiner. The usual chain of events is familiar: the milk briefly boils, the heat stays too high, rice settles on the bottom and caramelises until it turns black.
This is where the baking soda method shines. The rice starch softens, the milk residue releases, and the caramelised sugars crack away in small plates. After one round, only light shadows are usually left. If those bother you, repeat the process - or, on stainless steel, finish carefully with salt and a sponge.
Learning from these mishaps saves time and money: opting for heavier pans, lowering the heat, and setting a phone timer to remind you to stir at the right moment.
Extra tips to make the results last longer
Once you’ve cleaned the pan, rinse thoroughly and dry it straight away. Leaving moisture sitting on stainless steel can encourage water marks, and damp storage can make future cleaning harder than it needs to be.
If the smell of burning lingers, simmer plain water for a few minutes, then discard it and wash as normal. It won’t replace proper ventilation, but it can help take the edge off the odour without resorting to strongly perfumed cleaners.


Comments
No comments yet. Be the first to comment!
Leave a Comment