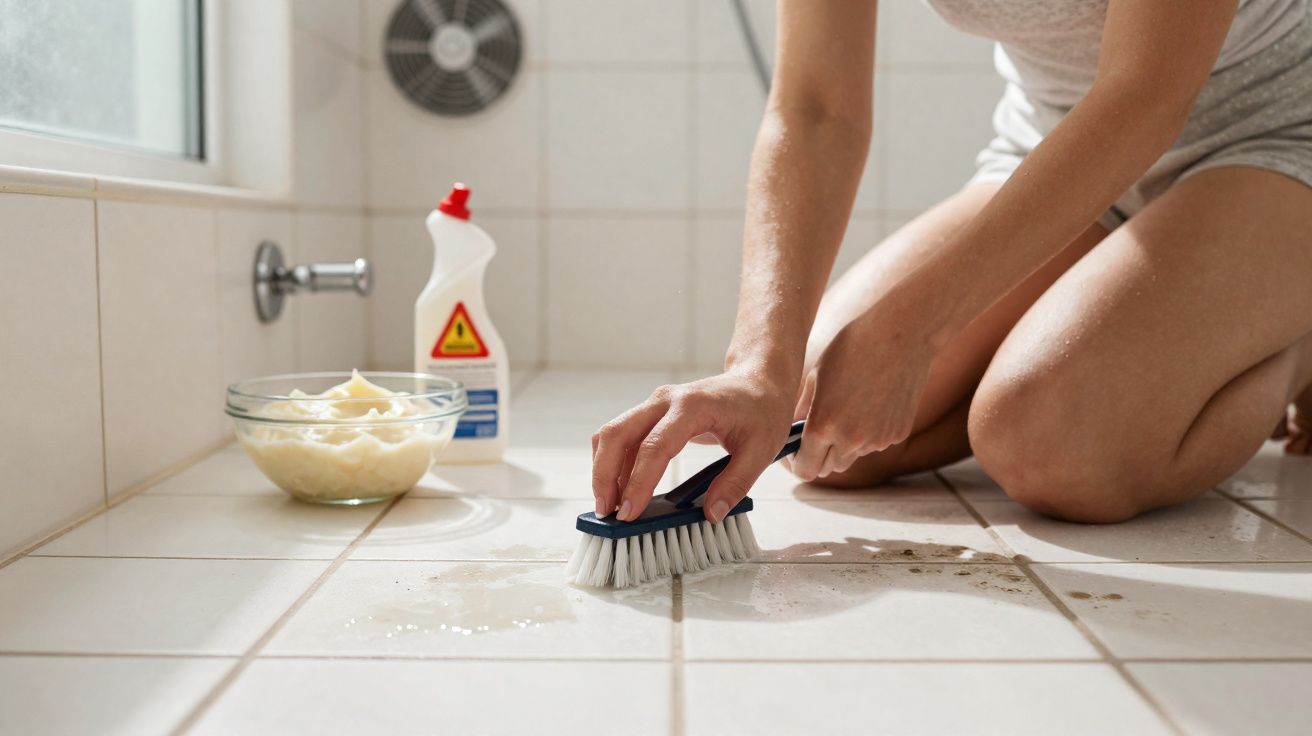
The clip starts playing before you’ve even clocked what it is. Pink rubber gloves glide over a yellowed shower tray, the camera lingering on that satisfying instant when grimy grout flips to bright white with a single pass. The on-screen text shouts: “3 INGREDIENTS – 15 MINUTES – NEW TILES!”
You stop scrolling. You glance at your own bathroom. Under the unforgiving ceiling light, the lines between your tiles suddenly look darker, older and-somehow-slightly embarrassing.
You watch again: baking soda, bleach, dish soap. A toothbrush. The comments are overflowing with hearts, “life-changing”, and “why didn’t I know this sooner?”
Then, buried further down, a different tone appears: “Professional cleaner here. Please don’t do this. You’re wrecking your bathroom.”
That familiar tug kicks in: quick magic versus slow damage.
The viral 3-ingredient grout hack that’s everywhere right now
The formula is almost laughably straightforward: a spoonful of baking soda, a generous squeeze of dish soap, and a splash of bleach. Stir it until it resembles thick cream, smear it along the grout, wait a few minutes, then scrub.
On TikTok and Instagram Reels, the 3-ingredient grout hack is packaged like forbidden knowledge-snappy edits, upbeat audio, and dramatic before/after shots that play like a conjuring trick. It’s the sort of thing you save at 23:47, promising yourself you’ll do it “properly” at the weekend.
A London renter I spoke to-Emma, 29-tested it late on a Sunday “just to see” on a small corner of her shower. She’d been staring at those dull grey grout lines for months, assuming they were simply “old”. She mixed the paste in an empty yoghurt pot, brushed it on, and within ten minutes she was messaging friends photos: “LOOK. I DID THIS.”
She didn’t ventilate much. No mask. The bathroom reeked of swimming pool and lemon detergent. The grout, though, was dazzling-so white it made the surrounding tiles look like they were the ones in need of help.
Chemically, the appeal is obvious. Baking soda gives a mild abrasive bite. Dish soap lifts body oils and residue. Bleach blasts stains, mould and bacteria. Used together, they behave like a miniature demolition crew-shearing off years of grime fast.
It’s also why professional cleaners and tilers visibly wince when they see it. Bleach doesn’t only kill mould; repeated use can erode grout, compromise sealants, dull patterns on some tiles and speed up corrosion on metal fittings. The short-term “win” is real. So is the long-term repair bill.
What cleaners say this “miracle paste” actually does to your bathroom grout and tiles
Scroll beyond the applause and you’ll find the people who clean bathrooms for a living. Their message is remarkably consistent: this viral miracle paste can deliver the best “after” photo you’ve ever taken-but if you repeat it, you may be quietly damaging the very surfaces you’re trying to rescue.
Grout is porous by nature and, compared with tile, relatively delicate. It isn’t designed to withstand harsh chemical attacks on a regular basis. Used too often (or too strong), bleach can weaken grout, encourage fine cracking, and open tiny pathways for water to creep in. And water in grout can mean moisture behind the tile-not just a bit of surface mould.
Ask a tiler or an experienced cleaner and you’ll hear the same kinds of stories: households using a bleach mixture monthly, then wondering why the grout starts crumbling and tiles begin to loosen. Landlords blaming “rough tenants”, only to find the culprit was enthusiastic DIY cleaning trends.
One commercial cleaner described bathrooms where metal trims around shower screens became pitted and rusty because bleach had splashed and been left sitting. Chrome taps lost their shine, rubber seals around doors distorted and split. The grout looked brilliant-right up until it didn’t.
From a technical point of view, a few problems stack up:
- Bleach is highly alkaline and aggressive, particularly against cement-based grout. Over time it can break down the binder that holds the grout together.
- If bleach soaks into unsealed grout and isn’t rinsed away thoroughly, it can remain in the pores and keep on degrading the material.
- There’s an invisible product-cocktail risk: many bathrooms already have residues from vinegar sprays, descalers or ammonia-based cleaners. Combined accidentally with bleach, these can create irritating-or dangerous-fumes. The hack never asks what was already on your tiles before you started scrubbing.
UK bathroom reality check: hard water and extractor fans matter
One factor these videos rarely mention is how much of “dirty grout” is actually limescale and soap scum-a bigger issue in hard-water areas across the UK. If you’re constantly fighting chalky build-up, harsh bleach-based mixes can feel effective while still leaving the underlying cause untouched.
Ventilation plays a role too. Many UK bathrooms rely on an extractor fan that’s underpowered, switched off too soon, or clogged with dust. Poor airflow means moisture lingers longer, encouraging mould and staining no matter how aggressively you scrub.
A safer way to rescue tired grout without wrecking your tiles
If your grout is simply dingy rather than failing, many pros begin with a gentler routine that prioritises time and repetition over chemical force:
- Steam the room lightly: run a hot shower for a short while to soften grime.
- Apply a paste of baking soda and a mild dish soap along the grout lines with a small brush, then leave it for 10–15 minutes.
- Scrub slowly, then rinse extremely well with warm water.
For small patches of mould, professionals often prefer oxygen bleach powder (typically sodium percarbonate) mixed with water, rather than straight chlorine bleach. It can be very effective on staining but is generally less aggressive on grout and less likely to attack metal trims-or your lungs.
Cleaners also emphasise that frequency beats intensity. A gentle approach once a month is far kinder than “going nuclear” twice a year. Add a quick wipe-down after showers and a weekly pass with a non-bleach bathroom spray, and you’re far less likely to end up hunting for a miracle paste at midnight.
Of course, real life isn’t a cleaning schedule. Towels pile up, the fan doesn’t always go on, and suddenly you’re doom-scrolling for a hack that promises to undo 18 months of “I’ll deal with it later.”
What professionals see most often is a mix of impatience and overconfidence: leaving harsh products to “work longer”, attacking grout with metal brushes, or combining cleaners because “more must be better”. Tiles don’t complain in real time. The damage tends to show up months later-quietly and expensively.
“People ring us furious at their landlord or the builder,” says Ana, a professional cleaner who works in short-term rentals. “But when we inspect properly, it’s obvious what’s happened. The grout’s been hit with hacks so often it’s basically surrendered. The bathroom didn’t just age-it was worn down by shortcuts.”
Practical rules that keep grout looking good for longer
- Skip the chlorine cocktail for routine cleaning; keep bleach for rare, targeted mould spots, and rinse extremely thoroughly.
- Use a soft brush or an old toothbrush on grout-avoid metal pads that scrape away the surface.
- Ventilate and patch-test a discreet area before trying a new method you’ve seen online.
- Once clean, consider re-sealing grout so staining and moisture don’t soak in as quickly next time.
- Ask a pro if grout is cracked, flaking or permanently stained-cleaning won’t fix structural problems.
When cleaning isn’t the answer: grout types and repairs
Not all grout behaves the same. Older cement-based grout can be more vulnerable to repeated chemical stress, while epoxy grout (common in some modern installs) has different cleaning needs entirely. If your grout is already powdery, breaking away, or separating from tile edges, a cleaning hack-however “viral”-is unlikely to help. At that point, re-grouting, targeted repairs, or a grout colourant may be the sensible route.
Between instant transformation and slow care, where do you land?
The 3-ingredient grout hack is so tempting because it compresses time. In 15 minutes you get that oddly emotional “new bathroom” feeling without spending thousands. It taps into a broader frustration: homes seem to age faster than we can keep up, and there never feels like enough time to stay on top of everything.
The cleaners warning that it “destroys your bathroom” are pointing to something far less glamorous: routine maintenance, patience and consistency. It doesn’t go viral, but it’s what keeps grout intact and tiles fixed to the wall.
Perhaps the real conflict isn’t DIY versus professional advice, but what looks good on a screen versus what survives in a damp corner through five UK winters. One side is optimised for the “after” photo. The other thinks in ten-year spans.
If you tried the hack and loved the result, you’re not alone. If you now regret it because your grout is crumbling, you’re not alone either. The question hanging in the steam is simple: when your feed serves up the next miracle paste, will you pause long enough to ask what it costs your bathroom five years from now?
| Key point | Detail | Value for the reader |
|---|---|---|
| Bleach-based hacks are aggressive | They can weaken grout, fade tiles, and corrode metal when used often or too strong | Helps avoid hidden long-term damage from a “quick fix” |
| Gentle routines work long-term | Baking soda, mild soap, and oxygen bleach, plus regular light cleaning, protect grout | Gives a practical method to keep tiles clean without wrecking them |
| Know when to call a pro | Cracked, crumbling, or deeply stained grout often needs repair, not more chemicals | Saves money and stress by stopping you from over-scrubbing what’s already failing |
FAQ:
Question 1 Is the 3-ingredient grout trick safe if I only use it once?
Answer 1 If it’s applied lightly to a small area, with strong ventilation and thorough rinsing, it’s unlikely to destroy your bathroom overnight. The bigger risk is turning it into your default routine every few weeks.Question 2 What should I use instead of bleach on grout?
Answer 2 Use a paste of baking soda and dish soap for everyday grime, and an oxygen bleach cleaner for stubborn staining. Both options are typically gentler on grout and nearby materials.Question 3 Why does my grout stay stained even after cleaning?
Answer 3 If staining has penetrated deep into unsealed grout, surface cleaning won’t fully remove it. You may need to re-grout or apply a grout colourant to restore a consistent finish.Question 4 Can vinegar and bleach be used together on tiles?
Answer 4 No. Mixing vinegar (acidic) with bleach can release dangerous chlorine gas. This is one reason professionals warn against random product combinations in bathrooms.Question 5 How often should I really clean my grout?
Answer 5 A quick weekly wipe and a more focused clean roughly once a month is usually sufficient in a typical home. The aim is to prevent build-up so you never feel forced into “miracle” hacks that can cause damage.


Comments
No comments yet. Be the first to comment!
Leave a Comment