We all crave that soft, satin warmth on timber-without a sharp chemical pong or a finish that turns tacky a few days later. A joiner I met showed me a method that delivers exactly that using just two ingredients you can actually name-and you can likely buy them today.
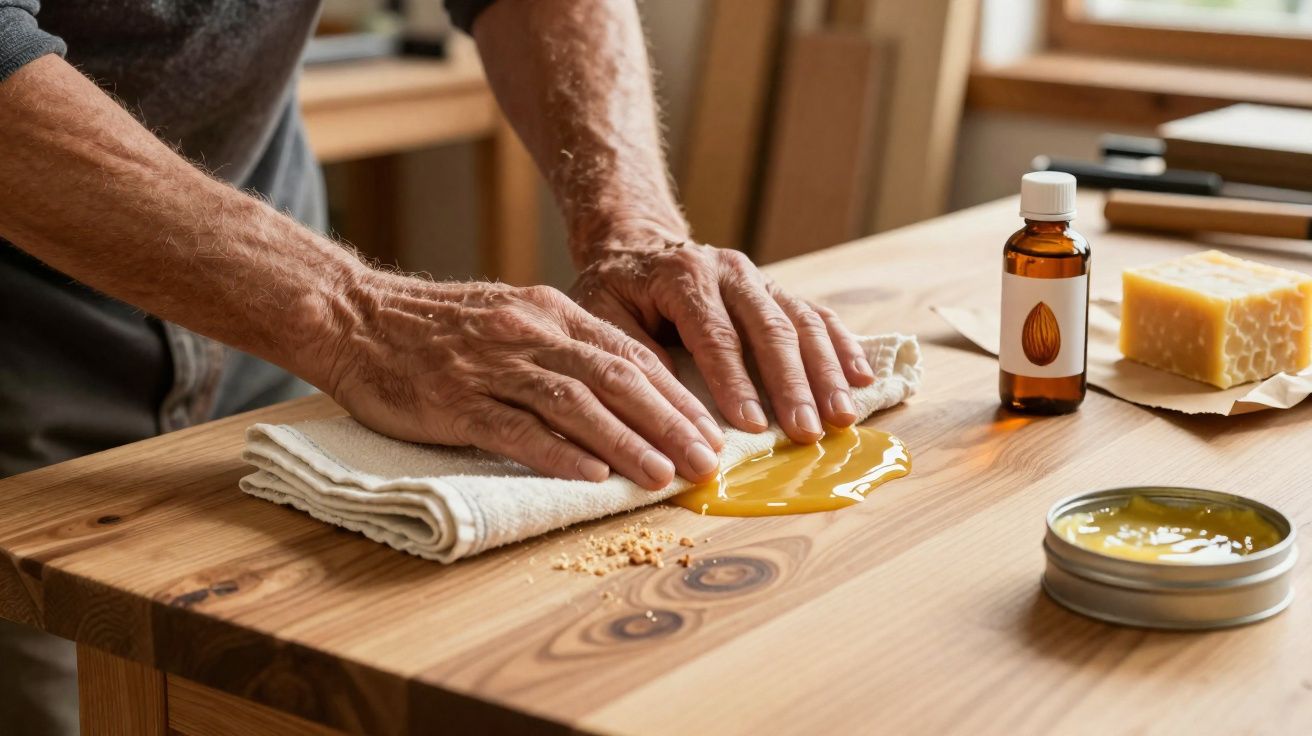
The workshop air carried a sweet mix of cedar dust and fresh coffee, with a radio murmuring in the corner as if it were part of the place. With his sleeves pushed up, he held a jar up to the pale winter light: sweet almond oil with pale curls of beeswax suspended inside.
He warmed the mixture in a makeshift bain-marie, much like melting chocolate, then dipped a cloth and wiped it over a tired oak board. The grain seemed to rouse, as though waking from sleep. The colour grew richer; the surface stayed dry to the touch yet felt alive-like leather eased into softness. He buffed once, then again, and the room filled with a scent of honey and marzipan.
The “secret” was almost laughably straightforward.
Why a joiner trusts beeswax and almond oil for wood polish
He told me he gave up silicone-based sprays years ago. They can make furniture look glossy, he said, but they often leave it feeling slick and slightly greasy-and they love to attract dust.
With beeswax and almond oil, the effect is different. Instead of sitting as a heavy layer on top, the almond oil soaks into the pores and calms dry fibres, while the beeswax forms a thin, flexible film. Used together, they bring back a glow that doesn’t demand another coat a week later.
He demonstrated on a maple sideboard that had endured years of elbows and hot mugs. One corner was dull and ashen-the sort of tired patch that makes you consider giving up. He worked in a thumbful of balm, waited about a minute, then polished it with a clean cloth. The grain brightened, and the panel looked refreshed. He tapped the surface, grinned, and said: Made in minutes. No fuss, and no lingering smell hanging about after supper.
There’s a little chemistry behind that calm sheen. Beeswax melts at roughly 62–65°C and cools into a fine structure that helps resist moisture without entombing timber beneath a plastic-like seal. Almond oil is lightweight and relatively slow to turn rancid, so it penetrates and keeps the wood feeling supple without leaving a sticky after-feel. By contrast, many synthetic polishes chase shine with silicones that smear and pull in dust. Here, the wax settles into a quiet sheen while the oil nourishes the fibres-simple, clean, tactile.
How to make beeswax and almond oil wood polish at home
Use a 1:3 ratio by weight: 30 g beeswax to 90 g sweet almond oil.
- Grate the beeswax so it melts evenly.
- Pour the almond oil into a heatproof jar.
- Stand the jar in a saucepan of gently simmering water (a bain-marie/double boiler).
- Warm the oil, add the grated wax, and stir until fully melted and clear.
- Remove from the heat, let it cool for a minute, then stir again.
- Optional: add 4–6 drops of vitamin E for extra protection against oxidation.
- Optional: add a very small amount of lemon or cedar essential oil for scent.
- Pour into a small tin or jar and leave to set.
Done properly, you get a balm that dries without a sticky residue.
Applying the polish for a dry, satin glow
Application is just as forgiving as the recipe:
- Dust the surface first.
- Test a small patch in an inconspicuous area.
- Work in a pea-sized amount with a soft cotton cloth, massaging it into the grain.
- Leave it for 15–30 minutes.
- Buff with a clean, lint-free cloth until the surface lifts.
That familiar moment often happens: the table looks merely “better”, then two extra passes suddenly make it glow. The common mistake is using too much. Thin coats are what win. If you can, leave the piece overnight before heavy use.
Common mistakes (and how to avoid them)
- Don’t rush the melt, and don’t allow water to splash into the jar.
- Avoid the microwave; gentle heat is far easier to control.
- In a cold room, the balm will set firmer-warm the jar between your palms before use.
- On sealed polyurethane finishes, the balm won’t sink in much and will largely sit on top; that’s fine, but expect more of a temporary lustre than a deeper refresh.
- If nut allergies matter in your household, replace almond oil with jojoba oil.
- A shine that lasts comes from patience and buffing, not from piling on extra wax-let’s be realistic, nobody maintains furniture like this every day.
“Wax isn’t make-up,” he said, flattening the cloth and pushing with his palm. “It’s a handshake. Wood should feel like wood-clean, warm, and made to be touched.”
- Ratio shortcut: firmer balm = 1:2 (wax:oil), softer balm = 1:4
- Target temperature: melt only until clear; never boil
- Cloths: old cotton T-shirt for applying, tight-weave microfibre for buffing
- Rest time: 12–24 hours before placing heavy items on top
A small ritual that changes how you see timber
Something shifts when you spend five quiet minutes with a cloth instead of reaching for a fast spray-and-wipe. You start noticing the scratches you’d stopped seeing. You catch how afternoon light runs through the grain. This balm encourages restraint: a little goes a long way, and the reward isn’t a mirror gloss-it’s a surface that invites hands.
It can also feel like the first step towards repair rather than replacement. A scuff on an oak chair can be softened rather than disguised. A desk dulled by screens and coffee rings can regain some presence. Perhaps that’s why the recipe feels larger than its parts: two kitchen-simple ingredients, a cloth, and a manageable bit of patience on a Tuesday evening. Share a tin with a neighbour, compare scents and ratios, and see what stories your furniture starts telling again.
Just as importantly, storage and housekeeping matter. Keep the tin sealed, store it away from direct sunlight and radiators, and label it clearly-especially if you’ve added essential oils or you’ve made both nut-based and nut-free batches. If the balm ever smells “off” (stale, paint-like, or sour), discard it and make a fresh pot; the ingredients are inexpensive, and it’s not worth rubbing questionable oil into timber.
It’s also worth thinking about where this finish fits in your home. Beeswax and almond oil polish is ideal for sideboards, coffee tables, shelves, and decorative pieces. For surfaces that see constant standing water or harsh cleaners (kitchen worktops, bathroom ledges), you’ll get best results by wiping spills promptly and treating the polish as part of a gentle maintenance routine rather than an impermeable barrier.
Key points at a glance
| Key point | Detail | Why it matters to you |
|---|---|---|
| Basic ratio | 1 part beeswax : 3 parts almond oil (by weight) | Creamy texture that’s easy to spread and buff |
| Method | Bain-marie, gentle melt, pour into a small tin | Reliable recipe you can complete in about 20 minutes |
| Maintenance | Thin coats, vigorous buffing, rest 12–24 hours | Long-lasting finish with a dry, warm feel |
FAQ
Can I use other oils instead of almond?
Yes. Jojoba is very stable and suits warm climates. Grapeseed works, but it can age more quickly. Olive oil is heavier and may add a noticeable smell, so use it sparingly.Is this food-safe for chopping boards?
The ingredients are edible, but nut oil can be an issue. For boards, switch to beeswax with fractionated coconut oil or pure mineral oil.How often should I reapply?
Low-contact pieces: every 2–3 months. High-use tables: monthly, or whenever the surface looks “thirsty”. A quick buff between coats helps extend the glow.Will it darken the wood?
Slightly. Oils deepen the tone and make the grain stand out. If you want to keep a very pale look, test in a hidden area first.What if my balm is too hard or too soft?
Remelt and tweak the ratio. Too hard: add a small splash more oil. Too soft: add a little more wax. Small adjustments make a big difference.


Comments
No comments yet. Be the first to comment!
Leave a Comment