Small, quick adjustments are worth trying first. Often, comfort returns after a few minor tweaks rather than a big change to your settings.
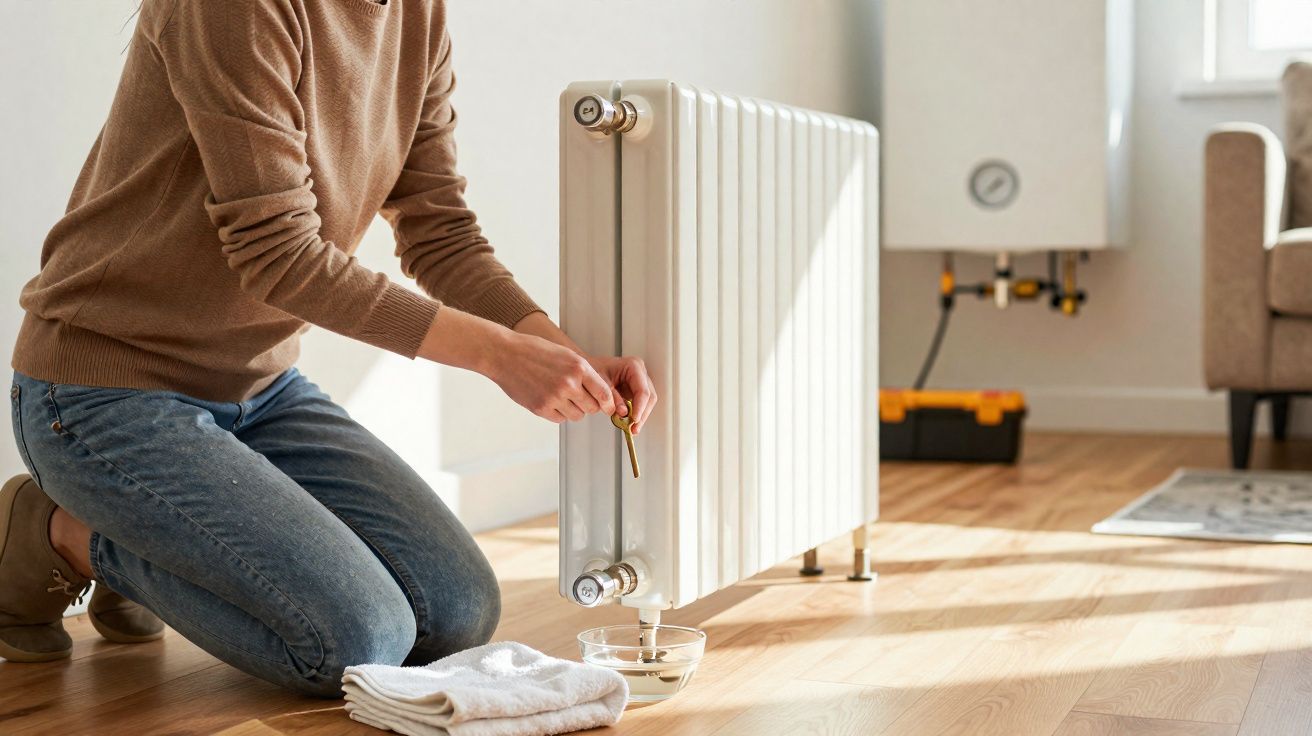
When the seasons turn, central heating weaknesses show up fast: trapped air, sluggish circulation and sticky valves can all make radiators underperform. With a cloth and a radiator bleed key, you can often get radiators working properly again in minutes-bringing back warmth while keeping energy bills under control.
Why radiators feel lukewarm
Warmth can disappear for several reasons long before you go anywhere near the boiler. Air commonly collects at the top of radiator panels and stops hot water filling the upper sections. Corrosion debris and sludge drop to the bottom, narrowing the waterways and restricting flow. Bulky sofas and heavy curtains can block convection, so heat never properly spreads into the room. After summer, thermostatic heads (TRVs) may seize and hold the valve pin shut. Pump speed also matters: too fast and water rushes past the last radiators; too slow and upstairs rooms can be left short of heat. The good news is that each cause has a straightforward remedy.
Aim for one clear outcome: a radiator that heats evenly-hot at the top, warmer (not cold) towards the bottom-with no hissing, gurgling or cold stripes.
Free first steps before touching the thermostat
Bleed radiators cleanly and safely
A radiator that’s cool at the top usually has air trapped inside. You’ll need a bleed key, a cloth and a small cup or container. Lay a towel down to protect the floor. Crack the bleed screw open by about a quarter turn. Let the air escape until you get a steady stream of water, then close the screw carefully (do not overtighten).
- Begin with the highest radiators in the property and work down one floor at a time.
- As soon as you’ve finished, check the boiler pressure. With the system cold, a typical target is around 1.0–1.5 bar (follow your manufacturer’s guidance if it differs).
- Turn the heating back on and run your hand near the surface (without touching a very hot radiator) to confirm heat is spreading across the whole panel.
Improve airflow around each radiator
Most rooms are heated mainly by convection, so blocking airflow wastes output. Pull furniture 10–15 cm away from the radiator. Brush dust from the fins and from behind the panel. Make sure thick curtains don’t drape over the radiator. If you have a shelf or a simple deflector above the radiator, it can help push warm air forward into the room instead of letting it pool near the ceiling.
Simply clearing the space around a radiator can make the floor-level temperature feel a couple of degrees warmer without using more gas.
Optimise the radiator circuit without raising the thermostat
Balance radiators using the lockshield valve
If one room is roasting while another is chilly, your system likely needs balancing. The lockshield valve is usually on the return side under a plastic cap. Use it to regulate flow: open it a little more on cold radiators and close it slightly on radiators that heat too aggressively. A well-balanced radiator is typically hot at the top and only warm at the bottom. Make small adjustments, then wait 20–30 minutes between changes so temperatures stabilise.
Adjust pump speed and keep an eye on pressure
A circulating pump set too high can cause whistling and leave far radiators underfed. Too low a setting can mean the loft or top floor never fully warms up. A sensible starting point is a mid setting, then listen for noise and check the last radiator on the run. After repeated bleeding, pressure can drop; top it up to the recommended cold figure (often around 1.2 bar) to reduce fresh air pockets and maintain steady circulation.
Any time you bleed the system, recheck pressure-low pressure reduces heat transfer and can quickly undermine comfort.
Low-cost upgrades that make a big difference for radiators
Small add-ons can improve comfort surprisingly quickly.
- Reflective foil behind radiators helps reduce heat loss through external walls by reflecting warmth back into the room.
- Radiator fans (also sold as radiator “boosters”) increase air movement, speeding warm-up and improving heat distribution in larger rooms.
- Replacing thermostatic heads (TRVs) can fix sticky pins and restore consistent control.
- Draught excluders and door seals stop the heat you’ve already paid for from escaping and reduce cold ankle-level drafts.
| Move | Cost estimate | Time | Likely benefit |
|---|---|---|---|
| Full bleed round | Free | 15 min per radiator | Quieter system; top sections heat properly again |
| Lockshield balancing | Free | 1–2 hours for a flat/house | More even room temperatures; fewer cold spots |
| Reflective foil/panel | £5–£10 per radiator | 10 minutes | Reduced loss through external walls |
| Radiator fan strip | £20–£40 | 5 minutes | Faster warm-up; better heat spread |
| New TRV head | £15–£30 | 10 minutes | Reliable control; fewer stuck valve pins |
Special setups and smart habits for radiator comfort
Communal heating in flats
With shared (communal) heating, you can still bleed your own radiators, but building-wide balancing is normally the responsibility of the managing agent or maintenance provider. If a radiator remains cold after a proper bleed, report it. Meanwhile, airflow improvements, reflective foil and draught-proofing can deliver noticeable gains without interfering with communal risers or plant equipment.
Older radiators, cold bottoms and sludge
If a radiator stays cold at the bottom even after bleeding, sludge is a likely culprit. A professional can carry out a power flush to clear the circuit. Fitting a magnetic filter on the boiler return helps catch metallic debris and protects the pump. Adding an inhibitor to the system water slows corrosion and helps keep radiators cleaner internally.
Added tip: check TRVs and radiator valves before winter
Before the first cold spell, turn each TRV from minimum to maximum and back again to confirm it moves freely. If a valve feels stiff or a radiator refuses to respond, it’s often quicker (and cheaper) to address a stuck pin early than to live with an underheated room for weeks.
Added tip: don’t overlook insulation and heat loss
Even perfectly balanced radiators struggle in a draughty, poorly insulated room. If one space always feels colder, check loft insulation depth, window seals and external wall draughts. Reducing heat loss means your radiators can reach and hold target temperatures with less boiler run time.
Warning signs to catch before winter sets in
- Ongoing gurgling usually means air is still trapped somewhere-repeat a full bleed pass.
- Distinct hot strips alongside cold areas often indicate balancing issues or sludge.
- Draping fabric over a radiator kills convection; use tiebacks or shorten curtains so the radiator remains uncovered.
- A TRV that seems “dead” may simply have a stuck pin: remove the thermostatic head, gently work the pin in and out, then refit.
- Repeated pressure drops can suggest a leak. Inspect valves and visible pipework, and call a technician if you see corrosion marks or rust staining.
A consistently comfortable home feels steady-fewer temperature swings, fewer boiler cycles and calmer airflow.
Go further without using extra energy
Use humidity and ventilation to your advantage
Air that’s too humid can feel clammy and strangely cool. Aim for 40–55% relative humidity indoors. Ventilate briefly in the morning to clear moisture after showers and cooking. Dry washing in a well-ventilated room. At night, close blinds or shutters to reduce heat loss through windows-while keeping radiator fronts clear.
Fine-tune room temperatures (and keep the boiler efficient)
Set realistic targets you can maintain: around 19 °C for living rooms, roughly 17 °C for bedrooms, and slightly lower for hallways. If a room consistently misses its target, open its lockshield a touch; if it overshoots, close it slightly. For efficiency, many systems perform well with roughly a 10–12 °C drop between flow and return across each radiator. Condensing boilers are most efficient with a cooler return temperature-often below 55 °C-so good balancing supports both comfort and efficiency.
Simple habits that save time and hassle
Keep a bleed key, cloth and small cup in one known drawer so you’re not hunting for them. Before balancing, mark current lockshield positions (a pen mark or a photo works) so you can revert if needed. Where possible, work with a cool system, and wipe any drips quickly to protect flooring.
A yearly boiler service helps maintain reliable output and can flag pump or control issues early (use a Gas Safe engineer for gas appliances). Adding a magnetic filter and topping up inhibitor tends to reduce noise, smooth out temperature swings and cut unnecessary run time.
Practical tools and a quick-start routine for radiators
A few basics make diagnosis much easier. A simple contact thermometer helps you compare flow and return temperatures on each radiator. A plug-in hygrometer lets you monitor humidity so ventilation is deliberate rather than guesswork. Foam door seals can remove draughts in minutes.
- Day 1: Bleed upstairs first, then lower floors; top up pressure; restart heating.
- Day 2: After one hour of heating, check room temperatures; adjust lockshields; wait; then recheck.
- Day 3: Fit reflective foil on external walls and maintain 10–15 cm clearance behind furniture.
- Weekend: If there’s no magnetic filter, fit one-or book a professional if sludge seems severe (black water, persistent cold bottoms).
If you prefer data-driven tweaks, try a modest overnight setback. Dropping the setpoint by 1 °C can cut heating use by roughly 7% over a season, with extra bedding covering the difference. Combined with the radiator improvements above, you can often feel warmer while the boiler does less work.
Heat pumps operate with lower flow temperatures than gas boilers, so balancing and unobstructed convection matter even more. Keep radiator faces clear, consider fan boosters in larger rooms, and ensure return temperatures stay within the system’s efficient operating range.


Comments
No comments yet. Be the first to comment!
Leave a Comment