You open the cupboard and a plastic avalanche spills onto the worktop. Lids skid in one direction, tubs roll in another, and in the middle of the mess you catch your own reflection thinking, “Why on earth do I live like this?” You restack everything-carefully, this time-only for the same wobbly tower of Tupperware to collapse again a week later.
One tiny change can prevent it.
It isn’t a brand-new organising system, and it certainly isn’t an expensive rack from an influencer’s kitchen. It’s simply a different way of placing plastic containers so they lock together instead of teetering apart. It’s almost suspiciously straightforward.
The hidden reason containers never stay stacked
Next time you put your food storage containers away, take a proper look at what’s happening. They’re not falling because they’re cursed. They topple because they’re battling physics: mixed sizes, mixed brands, and the slight warping that comes from heat and age-all trying to coexist on one cramped shelf.
What you end up with is a pile that looks “stacked”, but isn’t actually connected. One careless tug on a lid, one extra tub on top, and the whole column starts drifting and leaning.
A friend of mine, Emma, moved into a smaller flat last year. Her kitchen had a single narrow cupboard for everything that wasn’t a plate or a pan. She did what most of us do: large containers on the bottom, medium in the middle, small on top, with the lids shoved vaguely nearby.
Within days she stopped opening the door all the way, because something slipped out almost every time. Then one evening a tall container shot forward, bounced off the worktop, and cracked. She stood there holding two sad plastic halves and laughed-one of those slightly desperate laughs you do when you know the “system” is broken and you haven’t got the energy to redesign your life.
Here’s what’s really going on in that cupboard. The weight of the upper containers isn’t travelling straight down. It’s shifting sideways-encouraged by tiny gaps, curved edges, and lids wedged at awkward angles. The whole stack behaves like a never-ending game of Jenga.
The small adjustment that changes everything is this: your containers need to lock into each other vertically, not merely rest more-or-less on top. When the edges grip, the weight stops wandering and starts travelling downwards. That’s the moment a tower turns into a stable column.
The small adjustment that makes food storage containers lock together
The move that quietly fixes the chaos is this: nest by size, stack by footprint, and flip every second layer.
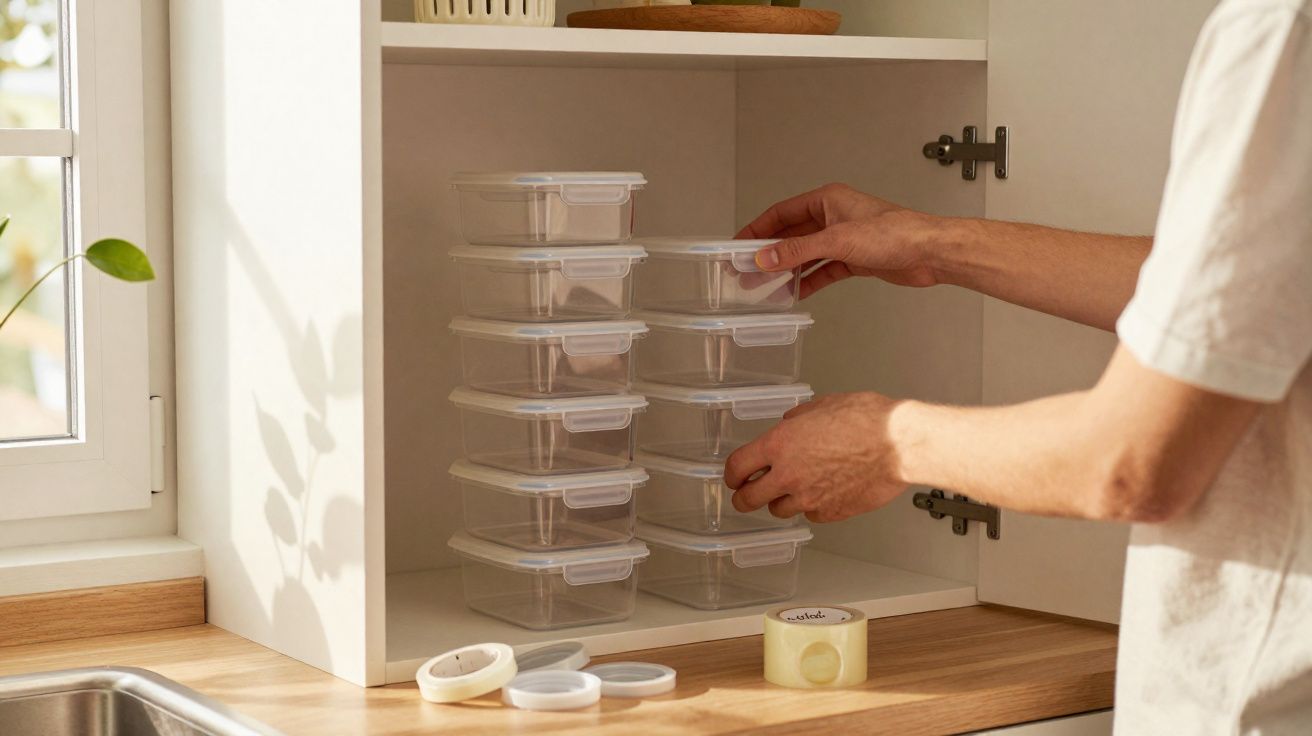
Start by separating containers from lids. Arrange the containers by size and shape-rectangles with rectangles, rounds with rounds, tall with tall. Then nest by size: put the largest towards the back and sit smaller ones inside them like Russian dolls, with the open side facing up.
Now for the key step. When you build the next “level”, don’t just perch another set on top. Flip every second layer: turn the upper containers upside down so the base of each one settles into the open rim of the container beneath. They’re no longer simply touching-they’re gripping.
Lids are where most stacks go wrong. Most of us treat them like stray socks: stuffed into corners, leaned against the side, or balanced “for now”. That’s the first habit to change. Store lids vertically, like records, along one side of the cupboard or in a simple file organiser. Don’t stack them flat-once they’re flat, they slide under containers and act like tiny slippery plates that make everything skate around.
And yes, real life happens. You won’t do this perfectly every single day. You’ll inevitably shove a lid in sideways after a late dinner. That’s fine. The aim isn’t perfection; it’s a structure that can forgive you a little without collapsing.
The emotional relief of opening a cupboard and watching everything stay put is wildly disproportionate to how small the change is.
Once Emma started flipping every second layer, her cupboard transformed. She put three large rectangular containers at the bottom, open side up, and nested two smaller ones inside each. Then she added another trio of rectangles on top-but upside down-so their bases dropped neatly into the rims below. The whole stack became one slightly clunky, but genuinely rock-solid block.
“Before, every time I cooked, I braced for impact when I opened that door,” she told me. “Now I pull out one box and nothing else moves. It’s like the kitchen finally calmed down with me.”
Here’s the method in a quick checklist:
- Flip every second layer so bases sit snugly into rims
- Stack by footprint: don’t mix round with rectangular containers in the same stack
- Store lids vertically so they can’t slide under stacks
- Keep one “everyday” container front and centre, not buried
- Leave a small air gap above the highest stack to avoid pressure and snagging
Two extra tweaks that make the system last longer
If you find your containers never seem to sit quite right, warping is often the culprit. Let hot food cool a little before sealing, and avoid blasting thin plastic with very high heat in the dishwasher if you can. The less warping, the better your rims and bases will “mate” when you flip every second layer.
It also helps to do a quick monthly reset: remove anything missing a lid, recycle containers that are stained or cracked, and keep only what you actually use. The flip-layer method works best when the cupboard isn’t trying to store a museum of mismatched tubs.
A small habit that quietly reshapes your kitchen
Once you’ve felt that tiny “click” of a stable stack, you start noticing other habits too. You stop buying random containers “because they were on offer” and begin choosing ones that match your existing footprints. Tall and narrow, or low and wide-either works, as long as you buy in families that nest neatly and stack predictably.
You may even win back an entire shelf. When containers sit tight instead of sprawling, the space above them becomes usable again. That’s where a baking tray can slide in, or a child’s lunchbox, or the mixing bowl you only use on Sundays. The cupboard shifts from a danger zone into a calm, dependable corner of the day.
| Key point | Detail | Value for the reader |
|---|---|---|
| Stack by footprint | Group similar shapes and sizes together | Fewer wobbling towers, easier access |
| Flip every second layer | Place one layer upside down so bases sit in rims | Containers lock vertically instead of sliding |
| Stand lids upright | Store vertically along one side or in a file rack | Prevents lids slipping under stacks and causing collapses |
FAQ
Question 1: What if my containers are all different brands and don’t fit neatly together?
Start by choosing one “family” of containers that works best and give them the prime space. Put the odd ones in a separate small basket so they don’t destabilise the main stack.
Question 2: Do I really need to store lids separately?
Yes-if you want real stability. When lids lie flat between containers, they behave like slippery little plates. Standing them upright removes that hidden layer of wobble.
Question 3: My cupboard is very deep. How do I stop things disappearing at the back?
Use a shallow box or tray as a “drawer” for your nested stack. Pull the whole tray out, take what you need, then slide it back. The flip-layer method still works perfectly inside the tray.
Question 4: Can this work with glass containers too?
Yes, provided the bases fit comfortably into the rims beneath. Just avoid stacking too high-glass is heavier and far less forgiving if anything tilts.
Question 5: What’s the fastest way to reset a chaotic container cupboard?
Take everything out, sort by shape, build one main stack using the flip method, stand lids upright, and keep one small box for “randoms”. You can usually do the whole reset in under 20 minutes.
Comments
No comments yet. Be the first to comment!
Leave a Comment