The first time you properly notice your grout is almost never on purpose. You’re wiping up a splash, the light catches the floor at just the wrong angle, and the neat pale lines between your tiles suddenly look… grey. Or yellowed. Or that weary beige that seems to mutter, “I’ve been through it.” You try washing-up liquid, then whatever multi-purpose spray is closest to hand, and nothing shifts. At that point you start asking yourself when, exactly, your bathroom became a “before” picture.
Then someone mentions, far too casually, that they “just mix three things from the pantry, wipe it on, and 15 minutes later it looks new”. You look at their bright kitchen grout, glance back at your own blotchy lines, and feel mildly betrayed.
Some cleaning tips sound like clickbait right up until the moment they work.
Why grout gets filthy even when you clean regularly
Grout is basically a sponge that didn’t volunteer. Tiles are smooth, sealed and easy to wipe; grout lines are porous, slightly rough and brilliantly good at holding on to whatever your home produces: soap scum, cooking grease, muddy footprints, coffee drips and hard-water deposits.
At the start it’s crisp and pale. Months later, it becomes a patchy record of daily life. The worst part is how gradually it happens-until you shift a bath mat or move a bin and find a strip of the original grout colour glowing next to the rest. The contrast lands like a tiny domestic horror film.
I saw this in a friend’s rented kitchen last year. She insisted the floor was “just old” until we slid the recycling box aside and uncovered a perfect rectangle of bright grout beneath it. No foot traffic, no splashes, no crumbs-so it stayed clean. The surrounding grout looked almost brown in comparison. She’d been mopping twice a week (more when the kids brought dirt in) and using a “deep-clean” product she’d picked up on offer, but it never reached what was embedded in the pores. Suddenly, all that effort felt like a practical joke.
There’s a straightforward reason: most everyday cleaners are formulated for non-porous surfaces. They glide over grout, perfume the room and evaporate without properly breaking down what’s lodged inside. Steam can help, and scrubbing helps too, but grime has chemistry on its side-oils cling, minerals set hard, soap scum bonds. To get real results, you need something that can dissolve, lift and scrub in tandem.
The baking soda + white vinegar + dish soap grout hack (the 3-ingredient pantry mix)
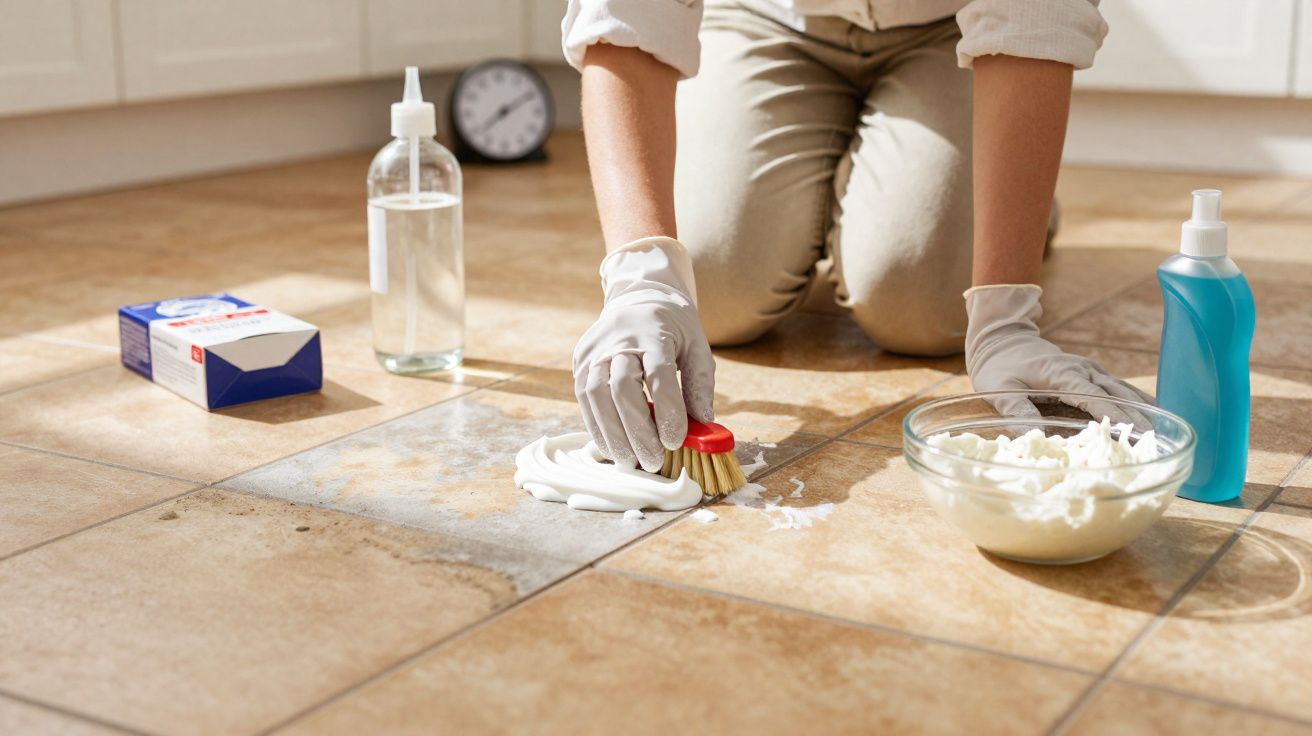
The viral “3-ingredient pantry mix” is almost annoyingly simple: baking soda (bicarbonate of soda), white vinegar, and dish soap (washing-up liquid). No mysterious powders, no harsh fumes, and no ten-step process that devours your Saturday.
Here’s the method:
- Sprinkle baking soda directly along the grout lines.
- Add a light drizzle of dish soap.
- Spray or pour diluted white vinegar over the top (white vinegar mixed with water in a spray bottle works well).
- Watch it fizz-then leave it for 10–15 minutes.
- Scrub with a stiff brush (or an old toothbrush for tight areas).
- Wipe with a damp cloth and rinse.
On light-coloured grout, the change can be genuinely startling.
The most common reason people decide it’s “overrated” is that they either rush the waiting time or use far too much product and scrub themselves into exhaustion. The point is to let the reaction do the hard work. Aim for a thin, even layer of baking soda, a few small dots of dish soap, and just enough vinegar solution to dampen everything and create a gentle foam. Then walk away-make a coffee, answer an email, scroll for a bit. Feeling slightly lazy is, weirdly, part of the technique.
A professional cleaner once told me, laughing, “Honestly, that mix is unfair competition. People try it once and suddenly think they don’t need me.” She was joking-mostly. When a £1 bottle of vinegar, a box of baking soda and your usual dish soap outperform pricey grout sprays, you start reassessing what’s under your sink.
- Ingredient 1: Baking soda – A mild abrasive that shifts surface grime without scratching most tiles.
- Ingredient 2: White vinegar – Breaks down mineral build-up and soap scum, and activates the baking soda.
- Ingredient 3: Dish soap – Cuts greasy residue and helps the mixture spread rather than clump.
What’s actually happening during those 15 minutes in your grout
From above, it just looks like bubbles. In reality, the three ingredients work on different parts of the problem at the same time. The baking soda sits in the grout’s tiny pores and provides gentle abrasion. The vinegar reacts, loosening mineral deposits and helping break down soap scum. The dish soap surrounds oily particles so they lift away instead of re-attaching as the floor dries.
It isn’t brute force; it’s slow, quiet teamwork. That’s why the 10–15 minute pause can feel suspiciously effective.
It also explains the mixed reviews. If your grout has years of deep staining, one pass won’t rewind everything in a quarter of an hour. You may need to repeat the process over a few days, or tackle it in sections rather than trying to do the entire kitchen in one heroic session. Testing a 1 m² patch near the sink and comparing it in the same light is often what convinces people-it turns “maybe” into a clear before-and-after, and suddenly you’re choosing which area to “treat” next.
A few practical precautions before you start
This mix is generally safe for ceramic and porcelain tiles, but vinegar is acidic, so it’s not for every surface. If you have natural stone (marble, travertine, limestone), skip the vinegar: acids can etch the finish over time, leaving dull patches that are far harder to fix than grubby grout.
It’s also worth doing the basics: open a window, wear gloves if you’ve got sensitive skin, and don’t mix this method with bleach-based products. If you’ve recently used a chlorine cleaner, rinse thoroughly and let the area dry before trying anything else.
The emotional payoff (and why it feels like a mini renovation)
The reaction people have to revived grout is oddly intense. Fresh grout lines make the whole room look brighter. A bathroom can appear newer even if the tiles are twenty years old. And yes-there’s often a flicker of annoyance at all the money spent on gels and sprays that never touched the ground-in dirt.
It’s that familiar moment when a low-tech trick your grandmother might have used beats a fluorescent bottle with half a dozen logos. You don’t need to become obsessed with grout. But once you’ve seen what baking soda, white vinegar and dish soap can do in 15 minutes, it’s difficult to ignore those lines again.
How this pantry mix changes your everyday grout-cleaning routine
Doing it once feels satisfying. Building it into a small, realistic rhythm is what keeps rooms from sliding back into “before” territory. You might do the shower this Sunday and the hallway next week. You might keep a jar of baking soda under the sink and a clearly labelled spray bottle of vinegar solution so set-up takes seconds. Some people switch to a long-handled grout brush to avoid ending up on their knees.
The goal isn’t perfection; it’s the quiet confidence of knowing you can reset the grout lines when they start to look tired.
Experienced cleaners will tell you the same thing in different words: the most dramatic transformations often come from the least glamorous products. They’re not threatened by the pantry approach-if anything, they’re amused by the surprise it causes. One cleaner said she now demonstrates a single “test line” before quoting for major work. If the grout responds well to the baking soda–white vinegar–dish soap combination, clients sometimes handle the rest themselves and bring in a professional only for tasks that genuinely require specialist tools.
Keeping grout cleaner for longer (what to do after the deep clean)
Once the grout looks better, a little prevention goes a long way. In kitchens, wiping spills quickly and avoiding overly soapy mopping water helps reduce residue that dulls grout over time. In bathrooms, running an extractor fan and squeegeeing wet tiles can cut down on soap scum and mineral deposits before they harden.
If your grout is unsealed and you’ve just deep-cleaned it, consider applying a grout sealer once it’s fully dry. Sealing won’t make grout stain-proof, but it does slow down absorption and makes future cleaning far easier.
| Key point | Detail | Value for the reader |
|---|---|---|
| Simple 3-ingredient mix | Baking soda, white vinegar, dish soap | Uses inexpensive pantry staples instead of specialist products |
| 15-minute contact time | Let the mixture sit before scrubbing | Boosts results with less effort and saves your arms |
| Targeted, not constant, use | Spot-treat sections or high-traffic areas | A realistic routine that still delivers visible improvement |
FAQ
- Question 1: Can I use this mix on coloured grout?
Usually yes, but test a small hidden patch first. Heavily tinted or poorly sealed grout can lighten slightly, especially if it’s already worn or faded.- Question 2: Will this damage my tiles?
On most ceramic and porcelain tiles, it shouldn’t. Avoid using vinegar on natural stone (marble, travertine, limestone), as acids can etch the surface over time.- Question 3: How often can I clean grout this way?
For most households, every few months is plenty. High-traffic areas or showers may benefit from monthly touch-ups or quick spot treatments.- Question 4: Do I need to seal my grout after cleaning?
If the grout is unsealed and you’ve just done a deep clean, sealing can help it stay looking good for longer by slowing staining and making future cleaning easier.- Question 5: What if the stains still won’t come out?
Very old, deeply embedded staining-or damaged grout-may not respond fully to home methods. In those cases, a professional deep clean or regrouting may be the only route to a truly “like new” finish.


Comments
No comments yet. Be the first to comment!
Leave a Comment