Information on seed bags, well-meant advice from neighbours and moon calendars often muddle things rather than helping. What really matters is not a fixed date in the calendar, but what is happening in the soil. A professional gardener relies on clear signals: temperature, soil structure and healthy seed potatoes. If you keep an eye on those factors, by the end of summer you will be hauling home full boxes from the garden instead of staring disappointedly at a half-empty storage cellar.
The right time to plant potatoes: follow the soil, not the calendar
The key question is simple: when does the soil feel “comfortable” enough for potatoes? Experts give a clear temperature range here: the earth should be at least 7 to 10 degrees Celsius at a depth of ten centimetres, and preferably a little warmer.
As a rule of thumb, below 7 degrees the tubers stall, while above 10 degrees they really take off.
The timing varies quite a lot depending on the region:
- Mild areas and coastal districts: usually late March to early April
- Mid-level areas and most of Germany: roughly mid-April to early May
- Cooler locations and low mountain ranges: often only safely from late April to early May
A soil thermometer from a garden centre, usually costing less than £15, removes the guesswork. Push it ten centimetres into the ground. If it shows around 10 degrees or more for several days in a row, the seed potatoes can go into the soil.
A quick sit test for the impatient
If you do not have a thermometer, there is a very simple check you can use: sit on the bare ground for a few minutes in the clothes you would normally wear in the garden.
- If you feel distinctly cold after a short while, the soil is still too chilly.
- If you can sit there comfortably for several minutes without shivering, conditions are looking good.
This is no substitute for a proper measuring device, but it gives a surprisingly reliable guide. Experienced gardeners recommend planting a week late rather than putting potatoes into icy soil too early. Early planting often leads to growth stalling, rotting and weak plants.
Preparing the soil properly: this is where the harvest is won
Potatoes love soil that is loose, deep and well drained. Waterlogging and heavy, cloddy ground slow growth and encourage disease. A quick check is easy: take a handful of soil and squeeze it together.
- If it forms a hard, sticky ball, clay or loam is dominating.
- If the clump falls apart easily and stays crumbly, that is ideal.
If the ground is too heavy, it is worth preparing it in autumn or early winter:
- Spread 3 to 4 centimetres of well-rotted compost over the area
- Work in a little sand to loosen the texture
- Leave coarse clods in place; frost will break them up naturally
Professional tip: the same area should only grow potatoes again every four years to help prevent soil-borne disease.
Earlier harvest by warming the soil
If you want especially early potatoes, you can give the ground a small head start a few weeks before planting:
- Lay black film or black fleece over the area
- Weigh down the edges securely so the wind cannot lift the covering
- After about two to three weeks, the top layer of soil will have warmed by 2 to 3 degrees Celsius
That can bring early varieties forward by one to two weeks. In short summers in particular, that makes a noticeable difference.
Seed potatoes: quality rather than using leftovers
A common mistake is to use supermarket potatoes as seed material. These are often treated to prevent sprouting. Even if they do sprout, they usually produce weak, disease-prone plants with a poor yield.
Certified seed potatoes from a specialist supplier are much better. They are healthy, true to type and tested. The yield figures show how worthwhile that is:
| Amount of seed potatoes | Expected harvest |
|---|---|
| 1.5 kg of seed potatoes | around 10 to 20 kg of eating potatoes |
Pre-sprouting for a head start of several weeks
Anyone who wants an early, abundant crop should pre-sprout the tubers before planting. The process is straightforward:
- Remove the seed potatoes from the net 4 to 6 weeks before planting
- Place them with the “eyes” facing upwards in egg boxes or shallow trays
- Keep them somewhere bright but cool, such as a light cellar, an unheated hallway or a garage with a window
- Wait until the sprouts are about 1 to 2 centimetres long and firm
Well pre-sprouted potatoes get going in the bed much faster and produce noticeably higher yields.
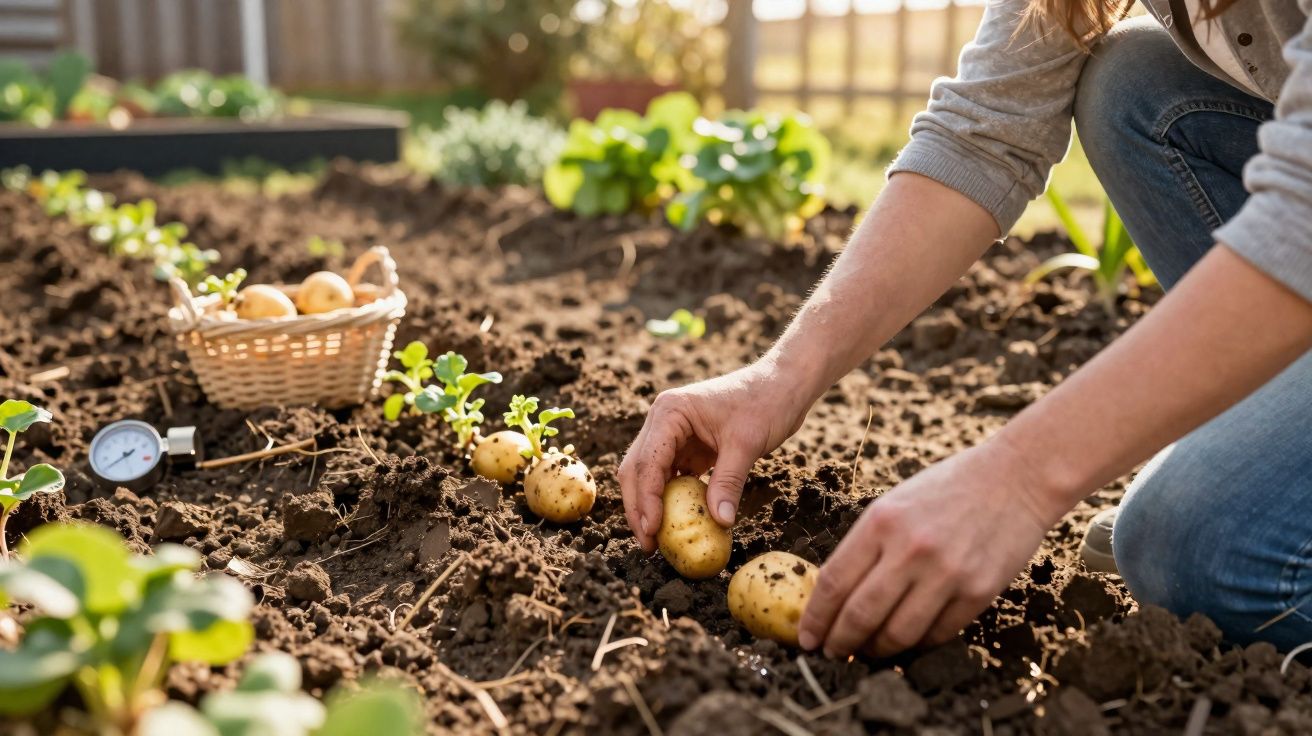
On planting day: how the tubers go into the ground
Once the planting date has been chosen, the real work begins. The site should be sunny and dry out quickly after rain. Partial or full shade immediately reduces yield.
Spacing, depth and orientation
For garden beds, the following measurements have proved reliable:
- Row spacing: about 60 to 70 centimetres
- Spacing within the row: 30 to 35 centimetres between tubers
- Planting depth: around 8 to 10 centimetres
Place the potatoes in a small hollow with the sprouts facing upwards, then cover them loosely with soil. If your soil is very light and sandy, you can plant a little deeper; in heavier ground, stay closer to the shallower end of the range.
Earthing up potatoes: why this step can double the harvest
As soon as the plants are about 20 centimetres tall, the crucial job follows: earthing up. In gardening language, this means drawing soil up around the stems with a hoe or spade from both sides so that a small ridge is formed.
That brings several benefits:
- New tubers form in the protected, loose mound of soil
- The potatoes stay shielded from light and do not turn green
- Weeds between the rows get buried
- The soil holds moisture more effectively
After two to three weeks, a second earthing up is usually needed once the plants have grown further. Anyone who carries this out consistently will see the difference clearly in the harvest crate.
Potatoes on a balcony or terrace
The same basic rules apply to pots, sacks and raised beds. Above all, each plant needs enough volume, at least 20 litres, plus free-draining compost and regular watering.
A simple approach is to fill a sturdy planting sack with loose compost, place two or three pre-sprouted tubers inside, cover them lightly with soil and then keep topping up with more soil as the plant grows. That creates a small ridge in the sack as well.
Common mistakes and how to avoid them
Many harvest problems can be traced back to just a few causes. Typical pitfalls include:
- Planting too early: tubers rot or stop growing for weeks
- Waterlogging: roots and tubers rot quickly, especially in hollows and heavy soil
- Persistent rain without protection: soil seals over, becomes hard and the plants suffer from lack of air
- No earthing up: tubers sit too close to the surface, turn green and become inedible
If you know your site, you can respond accordingly: in wet locations, plant on low ridges rather than in flat ground; in windy gardens, young shoots can be protected from late frost with a light fleece if necessary.
Extra practical tips for more yield and better flavour
Low-growing herbs such as dill or calendula can be planted between the potato rows. They soften the look of the bed and may confuse pests. Strong-smelling plants such as marigolds are often used to help reduce nematodes in the soil.
Regular mulching, for example with grass clippings in thin layers, keeps the soil moist for longer, suppresses weeds and protects the top layer of earth from capping over. However, grass cuttings should never be left in thick, wet lumps, otherwise rot can develop.
Some gardeners use a mix of early, mid-early and late varieties. That spreads the harvest over many weeks and lowers the risk of failure caused by heat, heavy rain or pests. This strategy makes particularly good sense in small home gardens.
When shoots start appearing, it also pays to water sensibly during dry spells. Water in the morning if possible, and direct the water to the soil rather than the leaves. That helps the plants make steady progress without encouraging disease in damp foliage.
Harvesting and storage matter too. Once the tops have yellowed and died back, lift the potatoes on a dry day and let the tubers dry off before storing them in a cool, dark place with good ventilation. That way, the crop keeps better and is less likely to sprout early or spoil.
If you keep all these points in mind - soil temperature, structure, healthy seed potatoes and consistent earthing up - an ordinary potato bed can become an astonishingly productive patch. Even from just a few square metres, you can easily end up with several sacks of home-grown, full-flavoured tubers.


Comments
No comments yet. Be the first to comment!
Leave a Comment