The white harbingers of winter are over, the border suddenly looks bare - and right now you decide how vigorously your snowdrops will return next year.
Once snowdrops have finished flowering, many amateur gardeners see nothing more than faded stems and feel tempted to “tidy everything away”. Yet if you reach for the shears now, or allow the bulbs to dry out, you will severely reduce next spring’s display. With just a few simple steps after flowering, you can instead strengthen the clumps and even multiply them.
Leave the foliage in place: why the “ugly” stage matters
After flowering, snowdrops enter the most important phase of their year, even if they are not at their prettiest. The green leaves are working at full speed. They are carrying out photosynthesis and sending energy back into the bulbs so that the plants can emerge again next winter.
If you cut snowdrop foliage back too early, you take away the bulb’s “battery” for the following year.
It usually takes around six to eight weeks after the final bloom for the foliage to finish its job. Only when the leaves turn yellow on their own, flop over and dry down is the storage process complete.
A common mistake: cutting too early for appearance’s sake
Many people remove the leaves as soon as the flowers are gone because the bed then looks untidy. That weakens the bulbs noticeably. The result is smaller clumps, fewer flowers and, in some cases, snowdrops not appearing at all the following year.
A better approach is a trick many experienced gardeners use: they combine snowdrops with perennials that emerge later in the season and hide the fading foliage. Good choices include:
- Hostas for partially shaded spots
- Ferns, which create a natural, woodland look
- Cranesbill geraniums, which quickly fill any gaps
That way the garden still looks attractive while the snowdrops quietly build up strength.
In lawns or meadow-style planting areas, it is best to leave any surrounding grass uncut until the leaves have yellowed as well. The same principle applies: the more time the foliage has to feed the bulb, the better next year’s display will be.
Water properly: moist, but never waterlogged
While the leaves are still green, snowdrops need enough moisture. If spring stays very dry, regular watering is worthwhile. The soil should remain evenly moist, but never properly wet.
Persistently soggy ground quickly encourages fungal problems and bulb rot. If you garden on heavy soil, it is better to improve it with sand or compost so that excess water can drain away more easily.
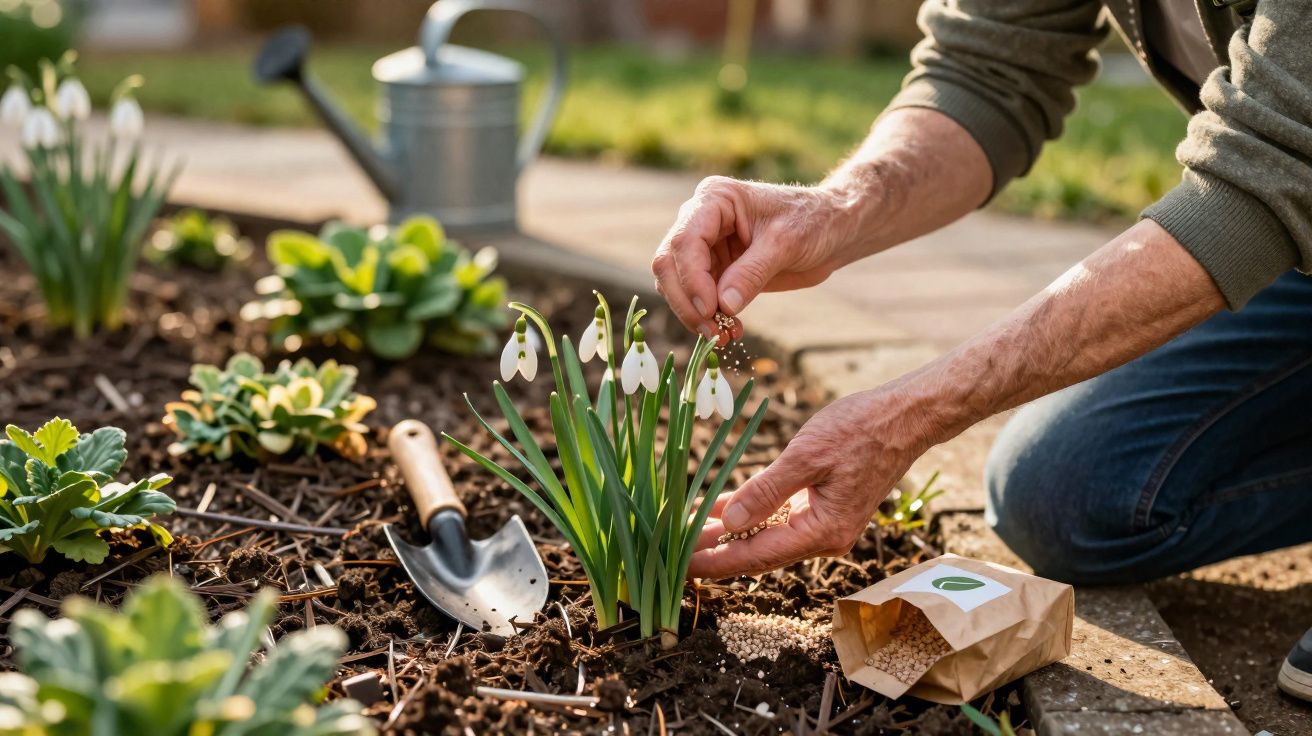
Feeding after flowering: how to make the bulbs stronger
The best time to give snowdrops an extra helping of nutrients is immediately after they finish flowering, while the foliage is still a rich green. In this period, the plant can absorb nutrients most effectively and store them in the bulb.
A potassium-rich feed after flowering works like a fitness programme for the bulbs.
An ideal choice is a specialist spring-bulb fertiliser with little nitrogen but plenty of potassium. Potassium encourages strong roots, stabilises the bulb and makes it more resistant to disease. Too much nitrogen, by contrast, drives leaf growth rather than flower production.
A simple feeding plan for home gardeners
- Apply fertiliser as soon as all the flowers have faded, while the leaves are still green
- Water thoroughly afterwards so the nutrients reach the root zone
- If clumps are weak, give a light second feed after about two weeks
- Stop feeding once the foliage starts to turn noticeably yellow
If you prefer to avoid mineral fertilisers, you can use organic alternatives. Finely ground bone meal or well-rotted compost both work well. Work them lightly into the soil or simply scatter them over the surface. This also improves soil structure, while the nutrients are released gradually over time.
Dividing and transplanting snowdrops: the right time
As the years go by, snowdrop clumps become denser. Flowering can then decline because too many bulbs are competing with one another. When that happens, it is time to divide them and spread them around new places in the garden.
Snowdrops are best moved “in the green” - in other words, straight after flowering while the foliage is still present.
That means lifting them not in summer as dry bulbs, but shortly after they finish flowering, while the leaves are still there. The plants can then keep growing in their new position and start rooting in before they enter dormancy.
Snowdrops also dislike being disturbed unnecessarily. If you want them to naturalise well, avoid digging over the whole area every year. Established colonies often perform best when left largely undisturbed, with only occasional lifting and replanting when the clumps become overcrowded.
Step-by-step guide to dividing snowdrops
| Step | Action | What to watch for |
|---|---|---|
| 1 | Lift the clump with a garden fork | Insert it from the side so you do not damage the bulbs |
| 2 | Gently pull the bulbs apart | Keep the roots as intact as possible |
| 3 | Plant them immediately in the new spot | Maintain the same planting depth as before |
| 4 | Water in thoroughly | Slurry the soil well around the roots |
Leave about eight to ten centimetres between bulbs. That gives them enough room to multiply again over the coming years. If you plant them more closely, you will get a dense carpet more quickly, but you will also need to divide them more often.
Garden design after flowering: hiding gaps cleverly
Once the foliage has completely died back, you may pull up or cut away the remains and add them to the compost heap. The bulbs stay in the ground, even though nothing visible on the surface reminds you of them.
Small plant markers or discreet labels are very useful. This is especially important in summer, when new plants are being added and it is easy to forget where the bulbs are. One careless spade thrust can destroy in seconds what has taken years to establish.
Mulch, soil care and suitable companion plants
A thin mulch layer during the warm months protects the soil from drying out and suppresses weeds. Two to three centimetres of bark humus, leaf mould or fine chippings is plenty. The layer should stay loose so that snowdrop shoots can push through it easily in late winter.
Under trees or in dappled shade, many suitable companions also thrive: lungwort, epimediums and wood anemones, for example, enjoy similar conditions to snowdrops. This creates a layered planting scheme that remains attractive from late winter through to autumn.
For a natural look, plant snowdrops in drifts rather than as isolated single bulbs. Grouped planting makes the display feel more woodland-like, and it also makes it easier to hide the fading leaves among other plants later on.
What snowdrops really need - and what harms them
Snowdrops are tougher than they look. If you know the key points, they need very little attention. Typical stress factors are waterlogging, constant soil disturbance and cutting back too soon.
They do best in loose, humus-rich soil that holds moisture without becoming saturated. A site in light shade - for example beneath deciduous shrubs or trees - comes very close to their natural woodland habitat.
For many people, accepting wilting leaves and apparently “empty” patches in the border takes a little getting used to. Yet this is precisely where you can tell whether a garden is merely chasing quick visual impact or working with the natural rhythm of the year. If you water, feed and divide snowdrops at the right time, and avoid cutting them back too early, you will be rewarded in late winter with dense, glowing white carpets that become more impressive every year.


Comments
No comments yet. Be the first to comment!
Leave a Comment