It was late, the corridor was freezing, and the front-door lock had decided to become a sculpture. No give. No click. Just that hard, metallic refusal.
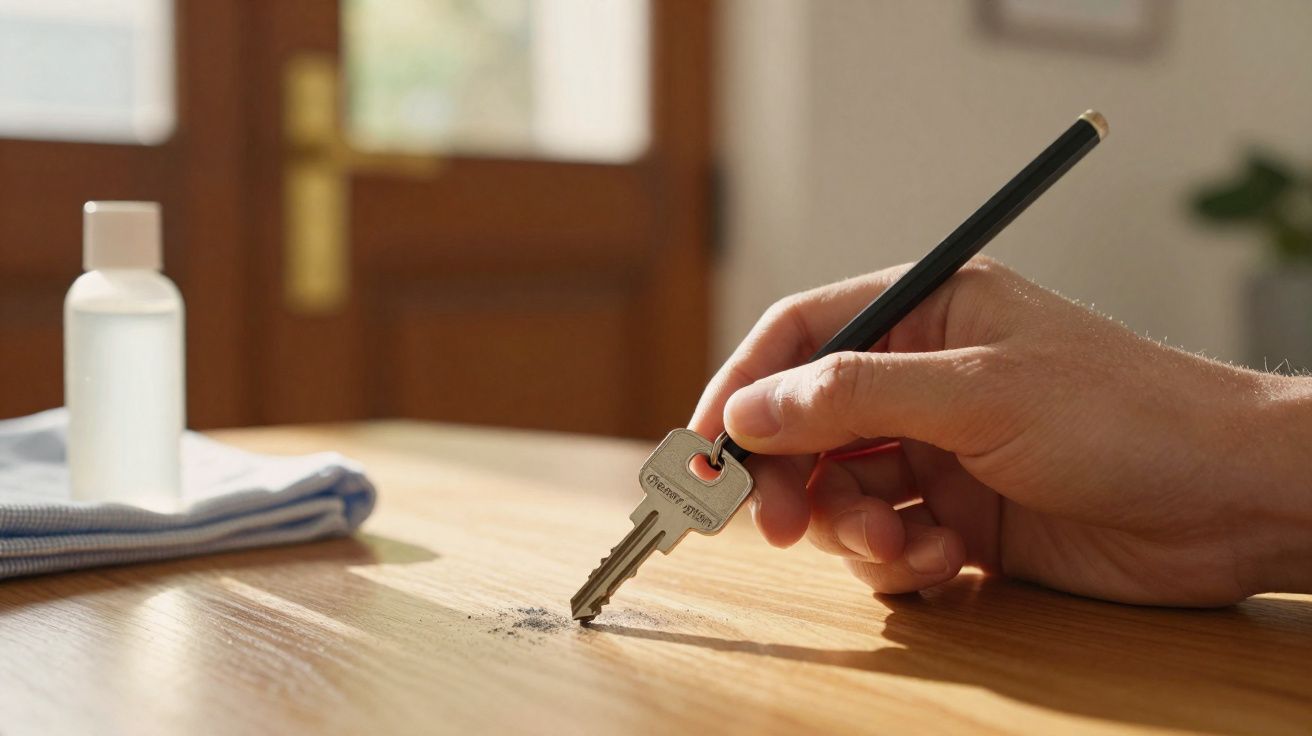
The man ahead of me didn’t curse or boot the door. He went to the kitchen drawer, returned with a blunt HB pencil, and calmly shaded the cuts on the key as though he were filling in a colouring book. Then he tried the lock again.
The key slipped in with a soft, almost hesitant ease. It turned. The door opened. As if nothing had been wrong.
That was when he said, “Graphite never lies.”
Why rubbing pencil lead on a key actually works
There’s a particular satisfaction in watching a stubborn lock give in. One moment you’re wiggling the key and hoping it won’t snap; the next, it turns as though someone quietly swapped the entire cylinder while you blinked.
At first glance, the pencil trick looks laughably basic: a few grey smudges on a metal key. No oil. No spray. No gadgetry. Just a pencil you’ve probably got at the bottom of a bag, or buried in that kitchen pot everyone seems to own-full of scissors, elastic bands and miscellaneous bits.
But there’s real mechanics behind the gesture, and it’s something locksmiths depend on in a more polished form.
At its simplest, a lock is a very tight negotiation between metal parts: the key’s cuts, the pins inside the cylinder, and the tiny springs that reset everything after you withdraw the key. When the system is clean and well-made, the movement feels almost silky.
Then normal life gets involved. Dust builds up. Humidity creeps in. Microscopic corrosion starts. Old lubricant ages into something tacky. The clearances shrink, and parts that used to glide begin to grab. A key you’ve used for years suddenly feels as though you’re pushing it through wet sand.
Graphite-the “lead” in a standard pencil-acts as a dry lubricant. Once it’s rubbed onto the key and carried into the lock, it helps friction step politely out of the way.
The reason is structural. Graphite is made of layers, and on a microscopic scale those layers behave a bit like a book whose pages don’t really want to stick together. They slide over one another with very little resistance. When you coat the key’s teeth with pencil lead, you’re loading those slippery layers onto the metal.
As you insert the key, the graphite transfers onto the pins and the inner walls of the cylinder. It doesn’t drip, it doesn’t turn into sludge, and it doesn’t attract grime the way many oils do. It simply sits there as a thin, dry film that allows metal surfaces to pass each other more easily.
That’s why it can work almost immediately. You’re not “fixing” the lock-you’re outsmarting the friction.
How to use a pencil on a sticking key, step by step
Use the key that’s sticking, and grab a normal graphite pencil. HB, 2B-any everyday school pencil is usually fine. Mechanical pencil lead can also work, provided it’s graphite and not coloured or wax-based.
- Hold the key by the bow (the part you grip).
- Shade the teeth thoroughly. Cover both sides, the edges, and all the little slopes and cuts. Aim to turn the working end noticeably grey.
- Insert the key into the lock once, then pull it back out.
- Shade again, then repeat the insert-and-remove cycle two or three times so the graphite is carried deeper inside.
- Attempt a full turn slowly, without forcing it. Let the graphite do the work rather than brute strength.
Most people learn this in mild panic: rushing to work, coming home laden with shopping, or standing under a streetlamp that flickers more than it illuminates, wondering how a front door can feel so personal in its refusal.
On a bitter winter evening in Manchester, Lisa (32) spent twenty minutes wrestling with the lock of the shared flat she’d just moved into. Her key stopped halfway and refused to go further. She was already picturing the call to the landlord, the unexpected cost, and a night on a friend’s sofa.
A neighbour heard the commotion, opened his door, and handed her… a pencil. Two minutes later, the lock turned with a small, muted click. That flash of relief is exactly why this hack travels from person to person, hallway to hallway.
The logic is blunt: you’re adding a dry lubricant precisely where metal is scraping against metal. No oil, no grease, nothing that later traps dirt and turns into grit-filled paste.
Graphite copes well with cold, heat and time compared with many “miracle” sprays. It doesn’t swell the internals of the lock, and it distributes gradually-each time the key goes in and out, it leaves a little more lubrication on contact points you can’t even see.
In other words, it’s the low-tech cousin of what machinists and locksmiths do with specialist products-same principle, fewer barriers to trying it.
A note on long-term care (and a cleaner option than a pencil)
If you find yourself doing the pencil trick often, it’s worth knowing there’s a neater variant: graphite powder sold specifically for locks. It delivers the same dry-lubricant effect with less mess on your hands and in your pocket, and it’s easier to apply directly into the keyway.
It’s also sensible to check whether the problem is friction at all. If a door has dropped slightly, or the latch and strike plate are misaligned, the key may feel stiff because the mechanism is under load. In that case, lubrication helps, but addressing alignment can stop the issue returning.
Tips, pitfalls and the limits of the pencil trick
In its simplest form, the method is three actions: rub, insert, repeat. No toolkit. No tutorial. Just patience-and a pencil that isn’t worn down to a pointless stump.
If the lock is extremely tight, you can gently tap the key once after inserting it, then remove it and add more graphite. Sometimes it takes three or four passes before it noticeably loosens. Keep your movements small and your pressure light.
If the key comes out marked with black streaks or metallic dust, treat that as feedback: the lock has been working too hard. You may notice the turn easing gradually with each attempt, almost as though the mechanism is “waking up”.
Now the part nobody enjoys hearing: sometimes graphite isn’t enough. If the key is bent, visibly twisted, or the lock has been taking on moisture for months, the issue may be more than friction.
Pouring cooking oil into the keyhole, or spraying whatever happens to be “slippery”, is the sort of improvisation that feels clever for ten minutes and becomes miserable six months later. Residue catches dust, dust cakes, and the cylinder starts ageing at an alarming rate.
Let’s be honest: almost nobody dismantles a lock to clean it every year. That’s why a small, dry boost from graphite is often the most realistic “maintenance” many locks ever receive.
“If graphite doesn’t help at all, the lock isn’t stuck - it’s damaged,” a London locksmith told me. “A good cylinder will usually respond within a couple of tries. Silence is a bad sign.”
A few straightforward rules make a big difference, even if DIY isn’t your thing:
- Use a real graphite pencil, not a coloured pencil or wax pencil.
- Don’t force a key that feels as though it might snap. Stop, shade, try again.
- If the key is bent, get a new copy cut before it worsens.
- A quick blast of air (or, at a pinch, a careful puff by mouth) helps clear loose dust.
- If the lock grinds, crunches, or fully blocks, call a professional before it fails completely.
We’ve all had that moment: jiggling a key in a door, half irritated and half anxious, insisting it’s “fine” while mentally calculating the call-out fee. This small pencil ritual won’t resurrect worn-out hardware, but it often buys you time.
Beyond the trick: what a graphite pencil on a key really says about our lives
For a few seconds, rubbing graphite onto a key is more than a “hack”. It’s a quiet statement: I’m not surrendering to this lock yet. I’ll try the simple, sensible thing before I throw money, drama and a broken key at it.
There’s also something oddly nostalgic about it. In an age of smart locks and keyless entry, a bit of school stationery turns up to solve an adult problem. No app. No battery. Just carbon dust and patience.
And the gesture points to a broader truth: much of everyday life hinges on invisible frictions-not only in doors and mechanisms, but in habits, routines and relationships. Sometimes progress starts with something thin and almost unseen that helps things slide again.
| Key point | Detail | Why it matters to you |
|---|---|---|
| Graphite as a dry lubricant | Carbon layers slide easily between metal parts | Explains why the pencil trick can work so quickly |
| Simple step-by-step method | Rub, insert, repeat a few times without forcing | Offers a practical, low-cost way to free a sticking key |
| Know the limits | No improvement can indicate real mechanical damage | Helps you decide when it’s time to call a locksmith |
FAQ: graphite, pencils, keys and locks
Can any pencil work for this trick?
Most standard graphite pencils (HB, 2B, etc.) work well. Avoid coloured or wax pencils, as they can leave greasy residue that may clog the lock.Isn’t rubbing a pencil on a key bad for the lock?
No. Graphite is widely used as a dry lubricant for locks. Unlike oil, it doesn’t readily attract dust, and it often improves how the mechanism wears over time.How often should I use graphite on my keys?
You don’t need to do it constantly. Use it when a lock starts to feel rough, sticky or hesitant, or occasionally on doors you use every day.What if the key still won’t turn after using graphite?
If there’s no change at all, the lock may be damaged, misaligned, or corroded internally. At that point, a professional locksmith stops being a luxury and becomes a necessity.Can I use this trick on car keys or electronic keys?
For older-style car door locks, sometimes yes-so long as it’s a mechanical key and a traditional lock cylinder. For electronic keys or high-security systems, follow the manufacturer’s guidance or speak to a specialist.
Comments
No comments yet. Be the first to comment!
Leave a Comment